
ADVERTISEMENT
ADVERTISEMENT
ADVERTISEMENT
Table of Contents
ToggleNo-Bake Lemon Cheesecake Cones – A Sweet Summer Sensation
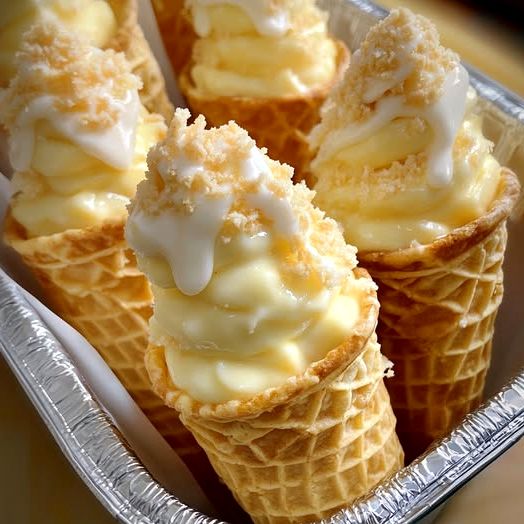
If you’re dreaming of a refreshing dessert that’s quick to make, doesn’t require an oven, and looks totally Instagram-worthy, look no further than No-Bake Lemon Cheesecake Cones. These delightful treats are the perfect fusion of citrusy flavor and creamy texture, served up in crispy waffle cones that add the ultimate crunch.
These no-bake cheesecake cones are perfect for any occasion — whether you’re hosting a backyard barbecue, a kids’ birthday party, or simply craving a light and zesty treat. They come together in minutes, and the best part? No heat, no fuss.
Why You’ll Love No-Bake Lemon Cheesecake Cones
These lemon cheesecake cones are more than just cute — they deliver on flavor, texture, and ease:
-
Quick to Make – Just mix, fill, and chill.
-
❄️ No Oven Required – Ideal for hot days.
-
Bright, Zesty Flavor – Lemon pudding and cream cheese bring a tangy twist.
-
Portable and Fun – Great for parties and gatherings.
-
Highly Customizable – Add fruit, sprinkles, or different drizzle toppings.
Key Ingredients
Here’s what you need to create these dreamy cones:
ADVERTISEMENT

ADVERTISEMENT
Main Filling:
-
1 box (3.4 oz) instant lemon pudding mix
-
1½ cups cold milk
-
8 oz cream cheese, softened
-
1 cup whipped topping (like Cool Whip)
Cones & Toppings:
-
6–8 waffle cones
-
½ cup white chocolate chips or vanilla glaze
-
¼ cup crushed vanilla wafers, graham crackers, or lemon cookies
Step-by-Step Instructions
Follow these steps to make your no-bake cheesecake cones with ease:
Step 1: Prepare the Lemon Cheesecake Filling
-
In a mixing bowl, whisk the lemon pudding mix with cold milk until smooth and slightly thickened (about 2 minutes).
-
In a separate bowl, beat the cream cheese until creamy.
-
Combine the pudding with the cream cheese and mix until well blended.
-
Gently fold in the whipped topping until light and fluffy.
Step 2: Assemble the Cones
-
Using a spoon or piping bag, fill each waffle cone with the cheesecake mixture.
-
Top with a drizzle of melted white chocolate or store-bought icing.
-
Sprinkle crushed cookies on top for a sweet and crunchy finish.
Step 3: Chill and Serve
-
Place the filled cones upright in a tray or cup holder.
-
Refrigerate for 15–30 minutes to firm up the filling.
-
Serve cold for the best texture and flavor!
Tips for Perfect Cheesecake Cones
-
✅ Use full-fat cream cheese for a rich, creamy texture.
-
✅ Let cream cheese soften before mixing to avoid lumps.
-
✅ Chill before serving to keep the cones firm and the filling set.
-
✅ Serve immediately after chilling to avoid sogginess in the cone base.
Flavor Variations
Want to put a twist on your cones? Try these delicious variations:
-
Strawberry Lemonade: Add diced strawberries into the filling.
-
Key Lime Cheesecake: Use lime pudding instead of lemon.
-
Tropical Bliss: Mix in crushed pineapple or mango.
-
Berry Swirl: Fold in blueberry or raspberry jam for a burst of fruity color.
Creative Topping Ideas
Top off your cones with flair using any of the following:
-
Whipped cream
-
Fresh berries
-
Mini chocolate chips
-
Shredded coconut
-
Colorful sprinkles
-
Honey drizzle
Serving Suggestions
These cones are perfect for:
-
Kids’ Birthday Parties – Fun to eat and mess-free!
-
Picnics or Potlucks – No forks or plates needed.
-
Baby Showers or Brunches – Add pastel colors for a themed look.
-
Holiday Treats – Use red and green sprinkles for Christmas or lemon zest for Easter.
How to Store and Make Ahead
-
Refrigerator: Keep filled cones in the fridge for up to 2 days. Use a cone holder or tray to keep them upright.
-
Make-Ahead Option: Prepare the filling in advance and store it in a sealed container for up to 3 days. Fill the cones right before serving to prevent sogginess.
Final Thoughts
No-Bake Lemon Cheesecake Cones are the dessert of your dreams — they’re light, creamy, tangy, and incredibly simple to make. Whether you’re whipping up a batch for a summer gathering or just treating yourself after a long day, these cones offer instant refreshment and irresistible flavor with zero oven time.
Plus, with so many ways to customize the flavors, toppings, and presentation, this dessert never gets old. It’s a guaranteed crowd-pleaser that looks as good as it tastes.
For more details, visit the full recipe
ADVERTISEMENT